Chocolate Covered Cheesecake Bites
This post may contain affiliate links. Please read the disclosure policy.
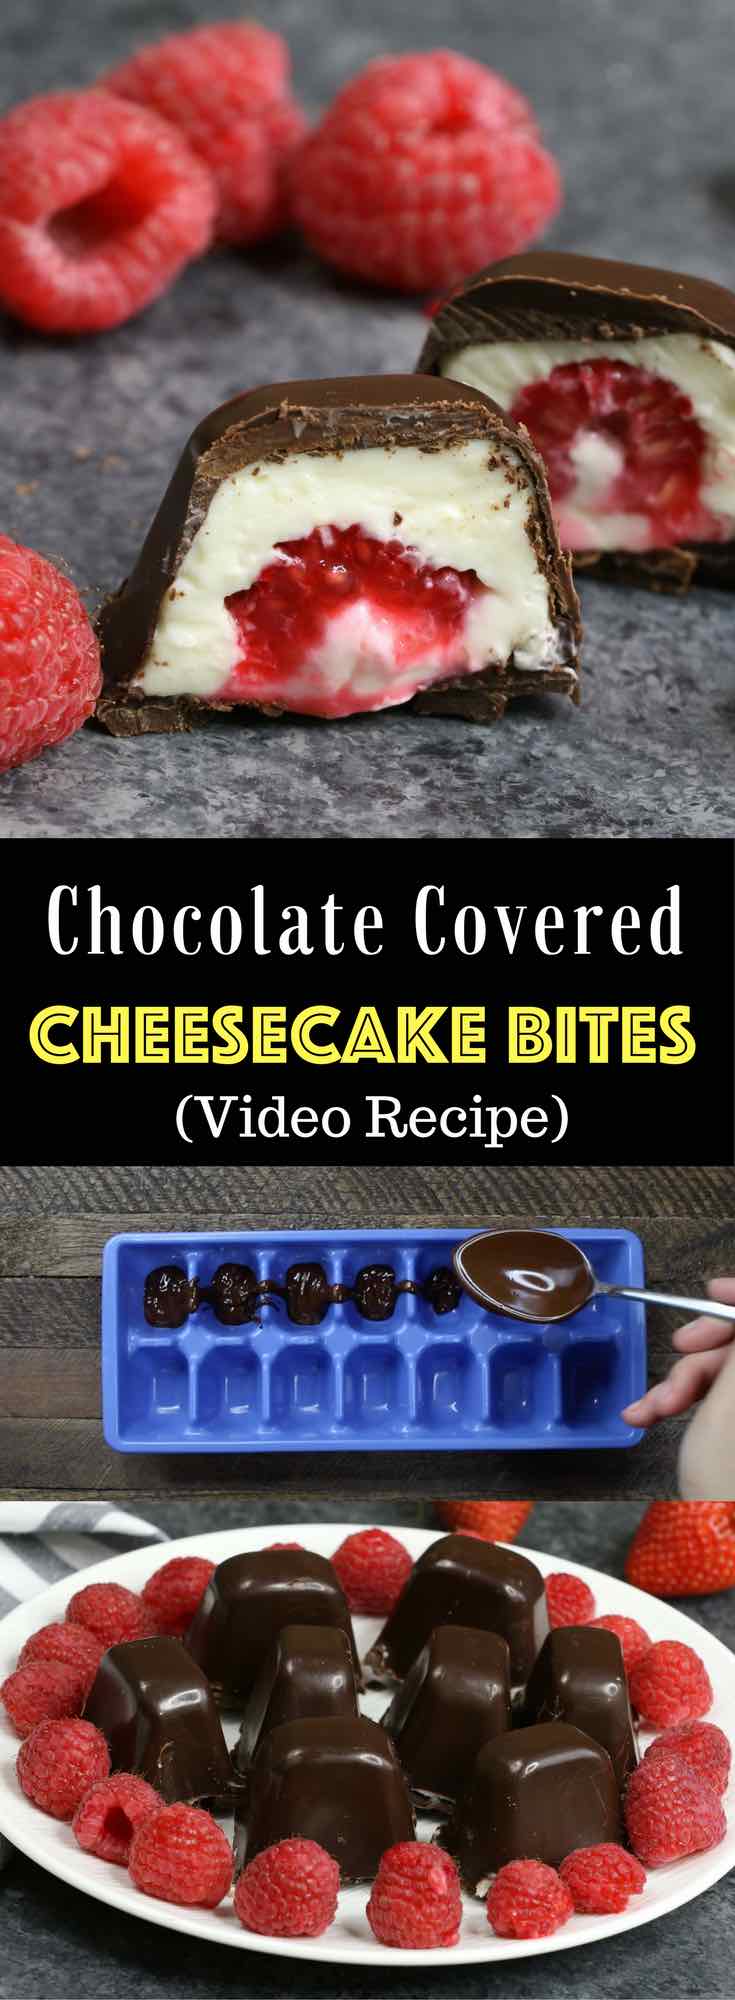
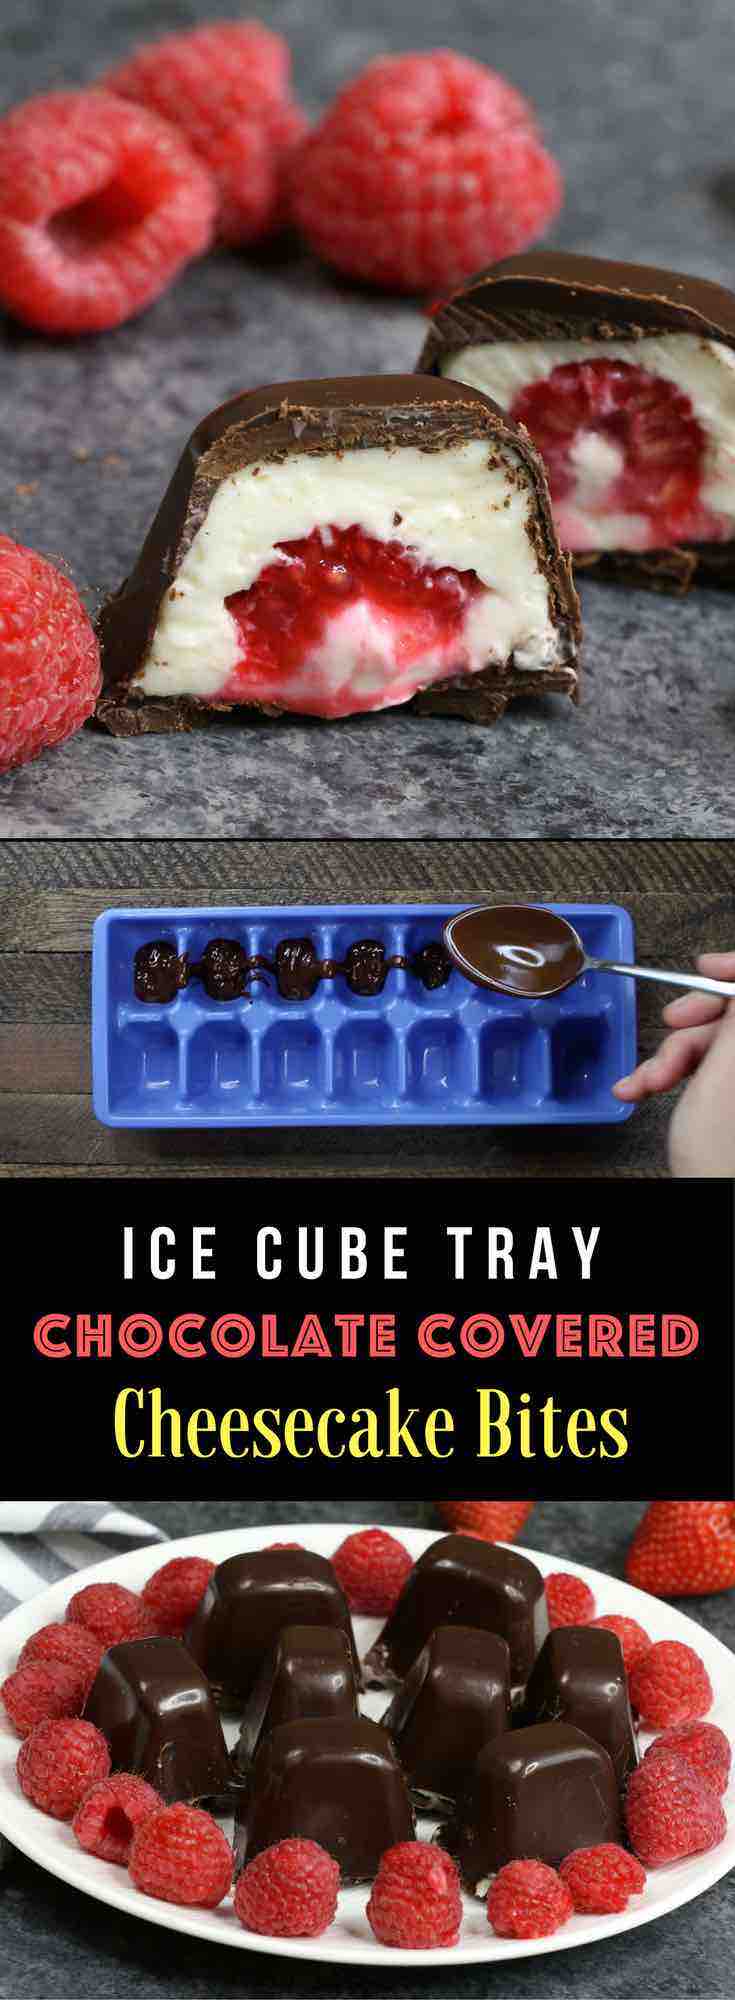
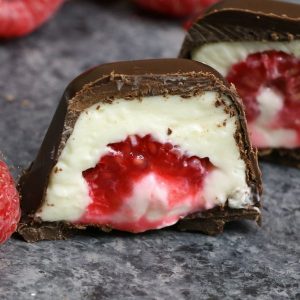
These Chocolate-covered Cheesecake Bites combine chocolate, cheesecake and raspberries into a mouthwatering bite-size treat. They’re easy to make-ahead with only 15 minutes of prep using an ice cube tray. Put them out for a party and watch them be the first to go! Plus video tutorial!

These cheesecake bites have been pinned over 200,000 times on Pinterest, and are one of my most popular bite size treats along with Mini Oreo Cheesecake Bites and Chocolate Covered Cookie Dough.
We get compliments every time we make them! Everyone loves the creaminess of the cheesecake, velvetiness of the chocolate and the fruitiness of the raspberries. This.Is.Amazing!
The best part? They’re so much less work to prepare than traditional cheesecake with no baking required! All you need is an ice cube tray, a brush and six simple ingredients.
How to Make Chocolate Covered Cheesecake Bites
You only need 15 minutes of prep time and an hour of chilling time to make these no bake cheesecake bites.
Step 1: Coat the Ice Cube Tray
Place the semisweet baking chocolate in a small bowl, and it in 30-second intervals in the microwave, stirring in between until smooth. I don’t recommend using chocolate chips, which can crack after chilling.
Spoon a teaspoon or so of melted chocolate into each ice cube tray cup. I used a standard size ice cube tray, and you may need to adjust slightly if yours is smaller or larger.
Use a brush or your finger to spread the melted chocolate up the sides of each cup to coat. Freeze the ice cube tray for 5-10 minutes until the chocolate coating is hard.

Step 2: Make the Cheesecake
In a medium bowl, beat the softened cream cheese with powdered sugar and vanilla. Here are some tips on how to soften cream cheese quickly if you forgot to take it out of the fridge ahead of time.
Once the cream cheese mixture is smooth, stir in the whipped cream. Your cheesecake is ready 🙂
Step 3: Make the Cheesecake Bites
Fill each ice cube cup about 1/4 full with cheesecake mixture. Then place a raspberry in each cup facing down. Then spread more cheesecake mixture on top to cover the raspberry. It doesn’t matter if it looks messy, since it’ll soon be covered up.
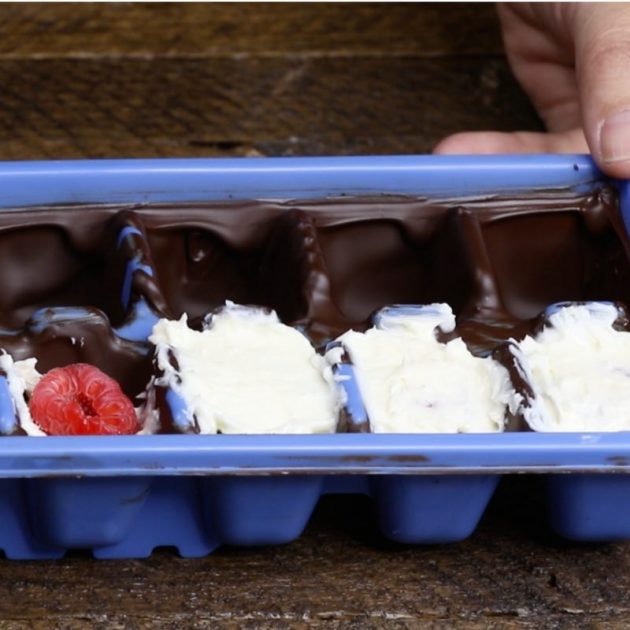
Finally, drizzle melted chocolate on top of the cheesecake to coat completely. Now place the ice cube tray on a level surface in the fridge to chill for at least an hour to firm up.
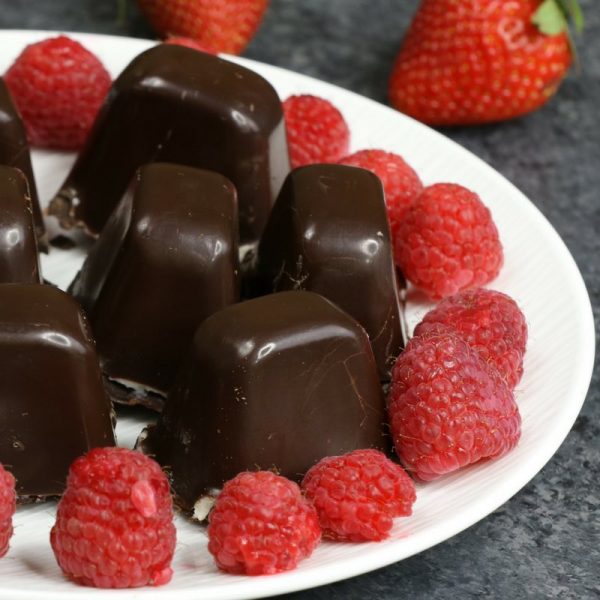
Step 4: Unmolding the Cheesecake Bites
Remove the ice cube tray from the fridge and invert onto a work surface. Let it sit for 10 minutes and the cheesecake bites should drop out as they warm up.
If they’re sticking for any reason, bang the tray gently on the work surface to help loosen them.
Tips and Secrets for Making Cheesecake Bites
- Use an ice cube tray with rounded corners for easier unmolding. Rectangular cubes will be difficult to unmold.
- Use quality baking chocolate like Baker’s or Ghirardelli for the best results. Do not use chocolate chips, which can lead to cracking when unmolding.
- Make sure you have softened the cream cheese to get an easily spreadable cheesecake mixture. Otherwise it may be too stiff.
- Allow the cheesecake bites to sit for 10 minutes before unmolding. As the chocolate warms up it becomes easier to unmold.
- Use light cream cheese for a lighter variation.
Make Ahead Tips
- You can make these cheesecake bites ahead of time and store in an airtight container in the fridge for 1-2 days. You can store for 3-4 days without the raspberries (just pure cheesecake).
- If you need to store for longer, they freeze well. Seal them in a ziplock bag and store for up to one month.
Watch How to Make Chocolate Covered Cheesecake Bites:
Ice Cube Tray Chocolate Covered Cheesecake Bites (Video!)
Ingredients
- 10 ounces semisweet chocolate, baking chocolate recommended
- 8 ounces cream cheese, softened
- 1/2 cup powdered sugar
- 1 teaspoon vanilla
- 1/4 cup whipped cream
- 14 raspberries, fresh or frozen
Instructions
- Place chocolate in a medium bowl and microwave in 30 second intervals until smooth.
- Take an ice cube tray, and coat each cube with chocolate.
- Freeze the ice cube tray for 5 minutes.
- In a medium bowl, mix cream cheese, powdered sugar, vanilla until smooth. Stir in whipped cream.
- Fill each ice cube 1/4 full with cream cheese mixture. Add 1 raspberry and then cover the rest with cream cheese mix.
- Add melted chocolate on top and chill for 1 hour to set.
- Remove from fridge and invert on a work surface.
- Wait 10 minutes for the cheesecake bites to drop out as they warm slightly. If needed, rap the tray on the work surface to loosen. Serve and enjoy!
Notes
- Use an ice cube tray with rounded corners for easier unmolding. Rectangular cubes will be difficult to unmold.
Please read our nutrition disclaimer.
Looking for more cheesecake bites?
- Deep Fried Cheesecake Bites
- Cheesecake Stuffed Cake Mix Cookies
- Reese’s Peanut Butter Cup Cheesecake Bars
- Raspberry Cheesecake Bites
- Chocolate Cheesecake Stuffed Strawberries
- Oreo Truffles
Editor note: Published April 7, 2017 and updated April 10, 2018
© TIPBUZZ. Images and text on this website are copyright protected. Please do not post or republish without permission. If you want to republish this recipe, please link back to this post. This post may contain affiliate links. Read the disclosure policy here.


My daughter & I made this for her co-workers for Valentine’s & they were a giant hit. I enjoyed them myself.
Loved it, beautiful, stylish and delicious!!!
Hi Vik, Great point, they are kinda stylish! Thanks for your comment and glad you enjoyed!
i just…
I tried reg. Ice tray and silicon and both wouldn’t come out. I even sprayed half and it didn’t work for me.
Hi Donna, So sorry to hear that. Use a tray with rounded edges and letting it sit upside down for 10-15 minutes should cause them to drop out.
I read all your comments and answers. Yet same here could not get them out of the icecube tray??? Taste great, just not pretty
Hi Cindy, Thanks for your comment. I added a note about using an ice cube tray with rounded corners for easier unmolding. Glad you enjoyed nonetheless.
These tasted great but I thought the cheesecake mixture could have been more dense. Next time I’ll add a little more powder sugar. For those having problems with the ice tray method, a regular candy mold works better. You can find them at your local craft store.
Hi Tanya, Thanks for your feedback and great suggestion about the candy mold. Will add to the recipe 🙂
Epic FAIL
Would not come out of trays!
Waste of time and money!
Your pictures look like chocolate with paraffin. Very shiny!
Do NOT waste your time
Hi there, So sorry to hear that – I know a bunch of other people made it successfully. Did you use baking chocolate (looks shiny!), and wait 10 minutes at room temperature before unmolding?
I tried this. Used two trays as I doubled the recipe. Could not get them out. It was just a big mess. Had to scoop them out with a spoon and they just crumbled. The chocolate on the bottom would not come out of the tray no matter what I did, so basically that was a very expensive waste as none of that chocolate could be used. Ended up with a goopy mess of cheesecake and raspberries with some chunks of chocolate.
Hi Teresa, Sorry to hear – if they warm up too much, they could become sticky as the chocolate softens. Normally they’ll slide out within 10 minutes of coming out of the freezer.
This didn’t work, there wasn’t enough chocolate or cheesecake mix and I did it according to recipe. It was just a big mess
Hi Vanessa, Sorry to hear that. If you used a larger ice cube tray it could have thrown off the proportions.
If anyone is having problems with getting the treats out of the tray.. try using a silicone ice cube try or even a silicone mini muffin tray
.. that way you can easily pop them out!! ??
Couldn’t get chocolate out of ice tray, is there another way to make these without using ice cube trays?
Hi Maggie, Let the trays sit at room temperature for 10 minutes and they should come out easily…
Can cherries be substitute for raspberries and in what form.
Hi JB, Great idea! It should work although I haven’t tried it yet. If you do let me know how they turn out 🙂
Can you freeze these after they’re made?
Hi Marti, Yes you can freeze for several weeks after they’re made. You might want to use frozen raspberries instead of fresh if freezing, but either will work. Enjoy 🙂
Would you recommend using Belgium chocolate so not to have issues with removing them from the tray?
Hi Tobi, Any baking chocolate is fine, could be Belgian or other… 🙂
My cheesecakes didn’t come out easily. It was a mess. Is there a trick to this? Should I spray the trays with Pam first?
Hi Kimberly, It’s best to use higher quality chocolate, chill them fully and leave them out of the fridge for 10 minutes before unmolding. Hope that helps!
Thank you so much for your detailed answer, will try it
Hi,
I’m on keto diet and can not use powdered sugar. What can I substitute it with and how much
Thanks
Hi Lili, thanks for asking. Try natural stevia powder which you can find on Amazon or in some supermarkets. The substitution ratio is usually 1:8, so to replace the 1/2 cup of sugar in this recipe, you’d use 1 tbsp stevia powder. Good luck!
Can i use real whip cream in a can instead??
I would not think so…you need the liquid aspect of the whipping cream
My mistake BJ… after watching the video I see it was whipped…I was assuming it called for the whipping cream before it was whipped… I definitely wouldn’t use the can stuff…just not as dense… 🙂
Is it cool whip or whipping cream?
Either will work fine…