Peppermint Bowls
This post may contain affiliate links. Please read the disclosure policy.

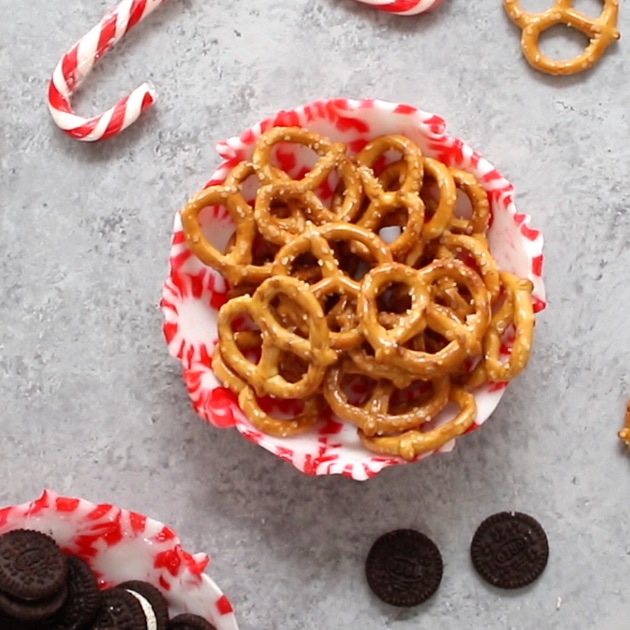
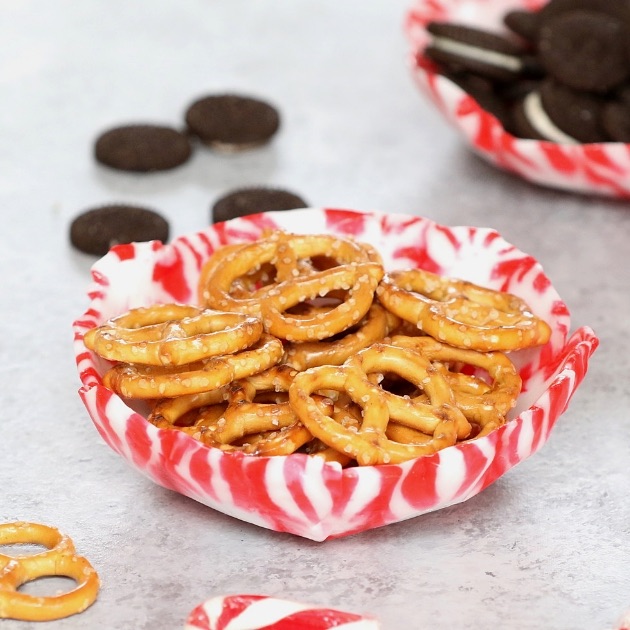
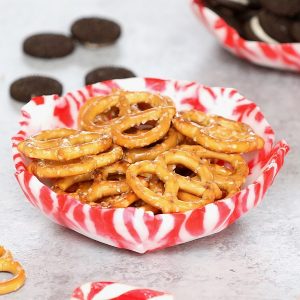
Peppermint Bowls are a festive DIY gift idea or addition to your holiday table. Use them to hold nuts, pretzels, candies or even ice cream! Keep one as a candy dish at work after the holidays are over. These adorable bowls are ready in just 15 minutes. Plus video tutorial!
Of all the holiday DIY crafts, peppermint bowls and stained glass cookies are my favorites. They’re both colorful, decorative and easy to make with just a few ingredients.
For these bowls, you only need one ingredient, peppermint candy, and about 15 minutes to make one. If you don’t get it quite right the first time, it’s only minutes to make a second one!
These bowls instantly become a conversation piece at a holiday party because they are so festive and obviously not store-bought. They’re perfect for holding nuts, pretzels, candies and other finger food.
HOW TO MAKE PEPPERMINT BOWLS
To make peppermint bowls, you’ll need the following supplies:
- Peppermint candies: you’ll need about 38 candies for two bowls
- Baking sheet
- Nonstick baking mat: the best option to prevent the candies from sticking to the baking sheet. If you don’t have one, use parchment instead.
- Nonstick cooking spray: for easy unmolding fromthe bowl
- Small bowl: Any 5-6 inch cereal bowl or pyrex mixing bowl with a fairly round bottom for molding
- Oven mitts: the candy gets hot and you want to avoid burns!
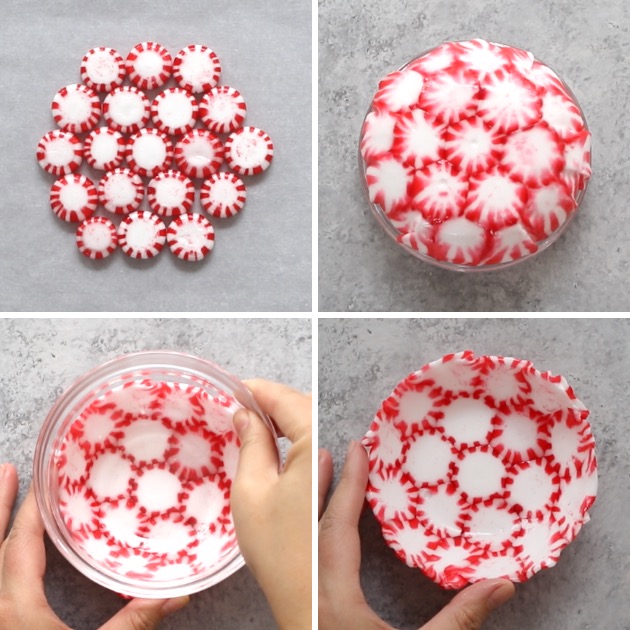
Making them is easy. Arrange the candies in a snowflake pattern on a baking sheet lined with a nonstick baking mat. Bake for 5-8 minutes until glossy and just starting to melt together. Invert the baking mat onto the upside-down bowl so the candies take its shape. Allow to cool, and pry it off gently.
After molding to the bowl, the candy only needs 5-10 minutes to cool down to set and become rigid. Then they can be used like any other decorative bowl, and they’re not too sticky or fragile.
Can you make peppermint bowls ahead of time?
Yes, these bowls will last months stored in a cool, dry place. I recommend using an airtight container to prevent dust accumulation and put a layer of parchment or wax paper in between bowls to prevent sticking.
Watch How to Make Peppermint Bowls:
Homemade Peppermint Bowls (with Video)
Ingredients
- 38 peppermint candies, about 10 oz
Instructions
- Preheat oven to 300°F / 175°C.
- Set aside a 5-6 inch cereal bowl with a smooth bottom. Line a baking sheet with a nonstick baking mat (best option) or parchment paper.
- Place one candy flat on the prepared baking sheet. Place six more candies around so they're all adjacent. Then add 12 more the same way around the outside.
- Bake for 5-8 minutes or until the candy just starts to melt and turn glossy.
- Meanwhile, place your bowl upside down and spray with non-stick cooking spray.
- Using oven mitts, remove baking sheet from oven and immediately invert the melted candies onto the outside of the bowl, pressing for at least 30 seconds to mold to the shape.
- Cool for several minutes and then gently pry the peppermint bowl off the cereal bowl using your finger tips.
- Repeat these steps for a second bowl if desired. Enjoy!
Notes
- For red and green color combination, try substituting these starlight mints instead.
Please read our nutrition disclaimer.
More DIY bowls:
Editor note: Originally published Dec 18, 2016 and updated Dec 12, 2018
© TIPBUZZ. Images and text on this website are copyright protected. Please do not post or republish without permission. If you want to republish this recipe, please link back to this post. This post may contain affiliate links. Read the disclosure policy here.


Oh. My. Word! It works! And yours was the easiest and detailed instructions I’ve found. Thank you😁 on to making many more.
Hi Mary, Thanks for your comment and glad to hear that!
Candy dish looks easy enuf, but I thot you couldn’t use paper in oven. ? I need to buy a baking may. I’ve never seen one. Can you believe that!!??
Hi Marci, Thanks for your comment. I know what you mean, but parchment paper is designed for the oven so no worries there. Try it and let me know how it turns out!
My bowl turned out well, however it is very sticky. Any suggestions on taking the stickiness out?
Hi Debi, Thanks for your comment and glad to hear. The bowl will become less sticky after a few hours or overnight. I’ve found some peppermint candies are stickier than others, so it’s luck of the draw sometimes.
Can these bowls be sealed with a finish to make them more durable?
Hi Colleen, Thanks for your comment. Unfortunately not really possible to seal up. However, the candy should spread as it bakes…
I sprayed Acrylic Sealer Gloss Finish (Walmart) on mine after they cooled down. They had a nice shiny finish and shouldn’t become sticky it gets wet by accident.
These bowls are just so pretty! I can’t wait to try this with my daughter!
Hi Wilhelmina, Thanks for your review and it’s a great craft activity to do with kids. Enjoy!
Great tips! These peppermint candy bowls are the cutest thing ever!
Hi Taryn, Thanks and hope you try them out 🙂