Blooming Onion
This post may contain affiliate links. Please read the disclosure policy.
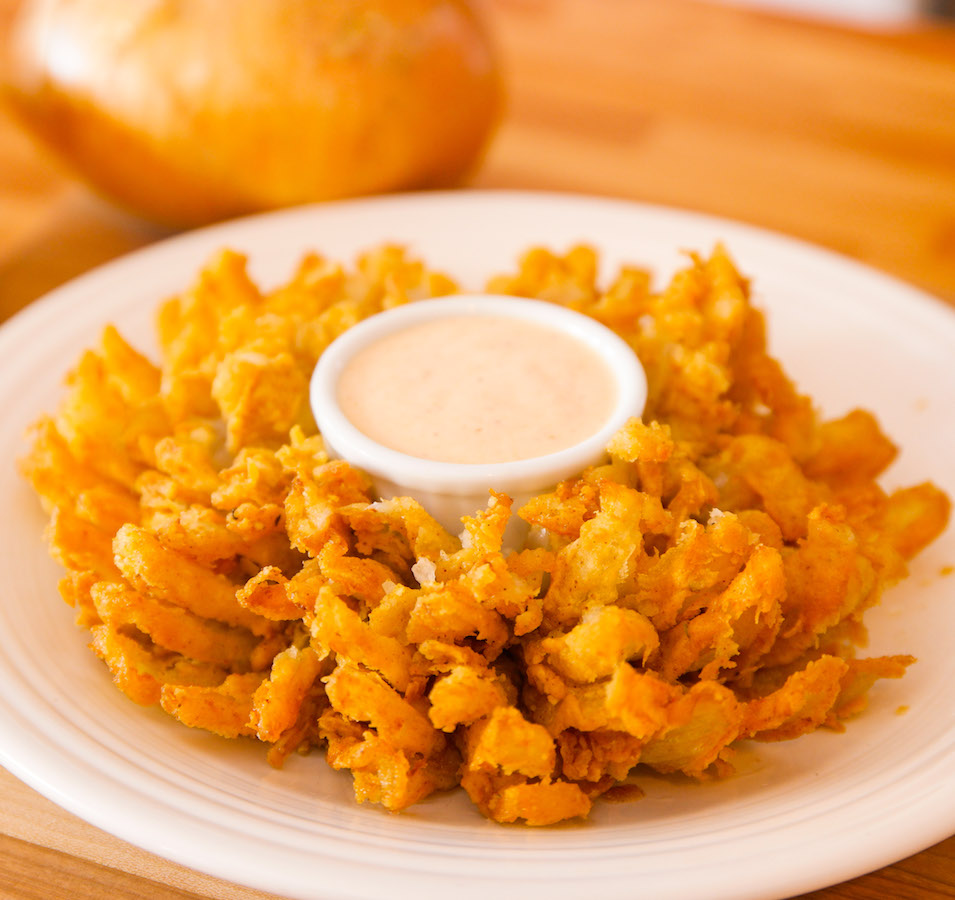
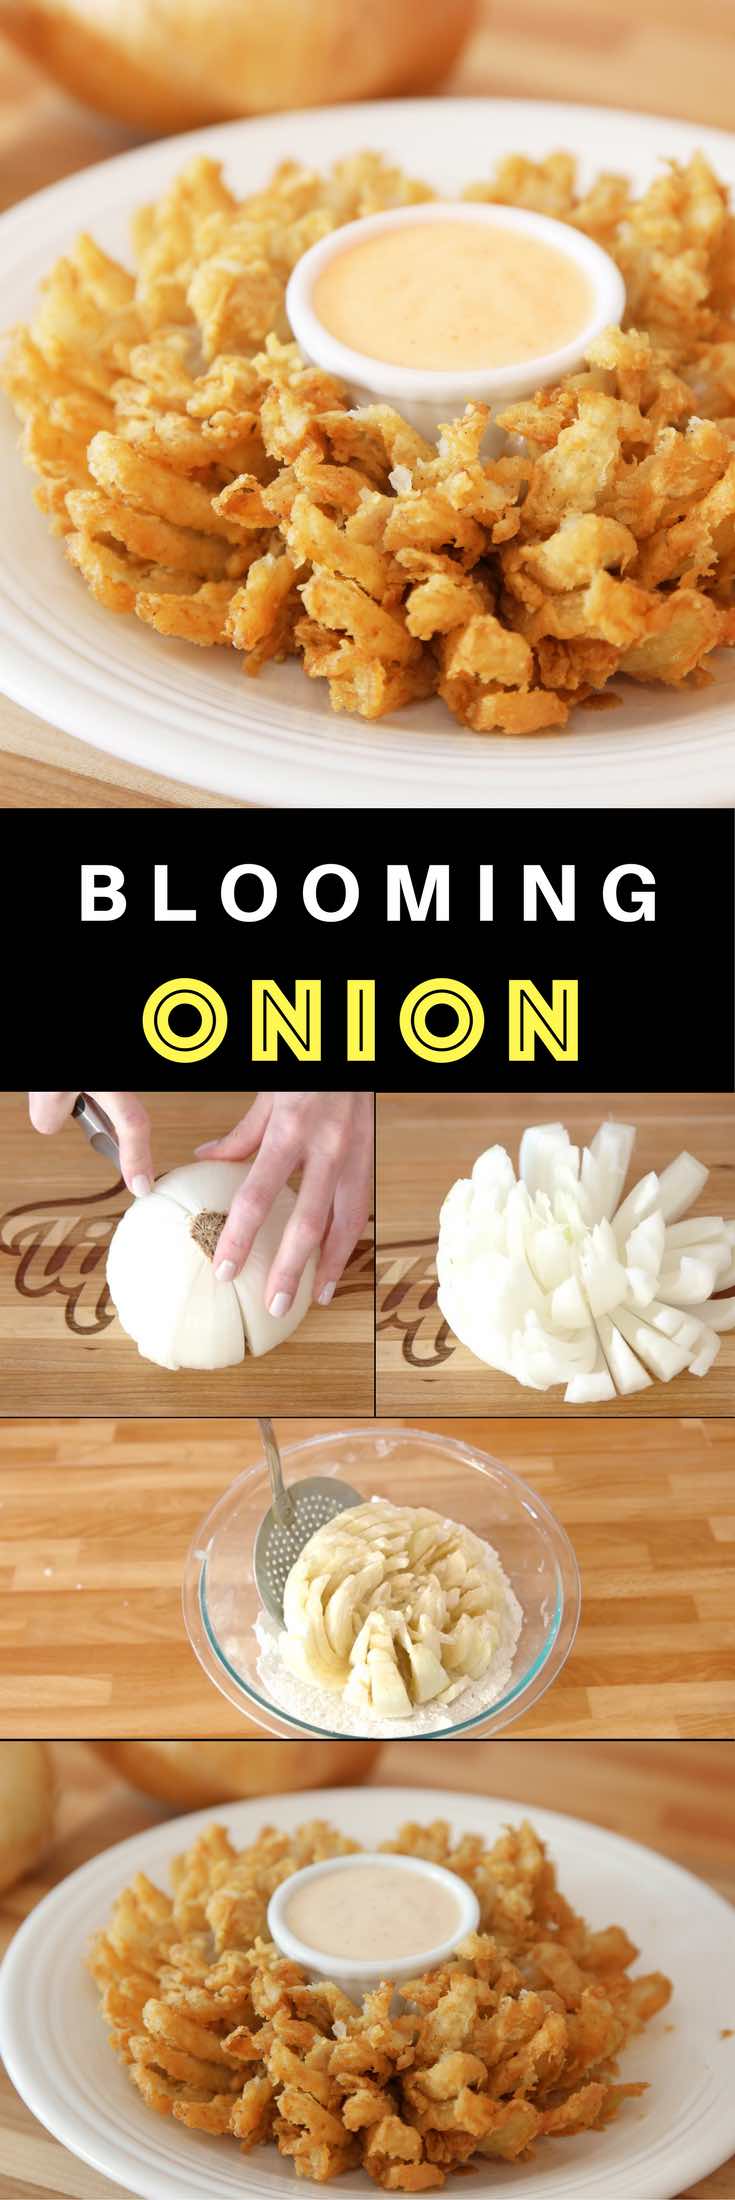
This Blooming Onion is crispy on the outside and tender on the inside, just like the appetizer at Outback Steakhouse. Find out how to make a Bloomin’ Onion in the comfort of your own home!
If you’ve ever had a blooming onion, you know how irresistible it is. Crispy on the outside and seasoned to perfection, it’s totally irresistible (and far better than onion rings in my opinion!).
You can make it at home with a little bit of effort, so let’s get started with everything you need to know here!
What is A Blooming Onion?
A Blooming Onion (also called a Bloomin’ Onion) is a popular appetizer originating at Outback Steakhouse, where it quickly became a mainstay of the menu. It consists of a whole onion that has been cut to resemble a flower, battered, and deep-fried until crispy.
The dish is typically served with a dipping sauce, such as a spicy mayo or a creamy horseradish sauce.
Ingredients You’ll Need
- large onion (yellow or white)
- all-purpose flour
- spices: paprika, cayenne pepper, garlic powder, oregano
- salt and pepper
- eggs
- milk
- vegetable oil for frying
In addition, you’ll want to have your favorite dipping sauce for serving. Options might include ketchup, Chipotle, Thousand Island sauce.
How to Make a Blooming Onion
Making your own blooming onion starts with cutting the onion itself.
How to Cut an Onion for Blooming Onion
You’ll need a large white onion to get started. Follow these steps to make an onion blossom:
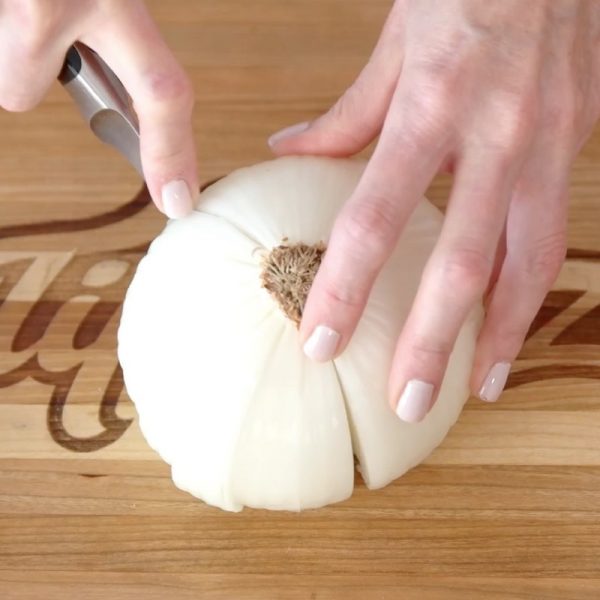
1) Cut off ½ inch from the pointy stem end of the onion while leaving the other end of root intact, which is important for holding it together. Then remove the papery skin.
2) Position the onion cut-side down and root-side up on a cutting board. With a sharp knife and starting ¾ inch from the root, make a downward cut all the way through to the board.
3) Repeat and cutting vertical slices around the onion about 1/4″ apart at the root, try to make cuts evenly and avoiding overlapping with the previous cut. You will get about 12 to 16 vertical cuts depending on the size of your onion.
4) Turn the onion over and gently spread the “petals” of the onion apart. Open from the outside and working towards the center. If any cuts break off during this process, just remove them. Don’t worry and it happens often. Once complete, it should look like an onion flower.
Note: 1) Buy the largest white onion you can find at your local grocery store. 2) In case your onion doesn’t open enough after the cut, you can place it in cold water for about 1 hour to help them open. Make sure to drain it well and use paper towel to pat dry.
Making the Batter
Prepare two separate medium-large bowls (larger than the size of your onion). In one bowl, combine flour, paprika, cayenne pepper, garlic powder, oregano, salt and pepper, then mix well. In the other bowl, beat eggs, add milk and mix well to make egg wash.
Dipping the Onion
Double-dipping process is the secret to getting the best crispy texture of the blooming onion. It takes a few more minutes, but you will agree that it’s totally worth the effort! Here is how to do it right:
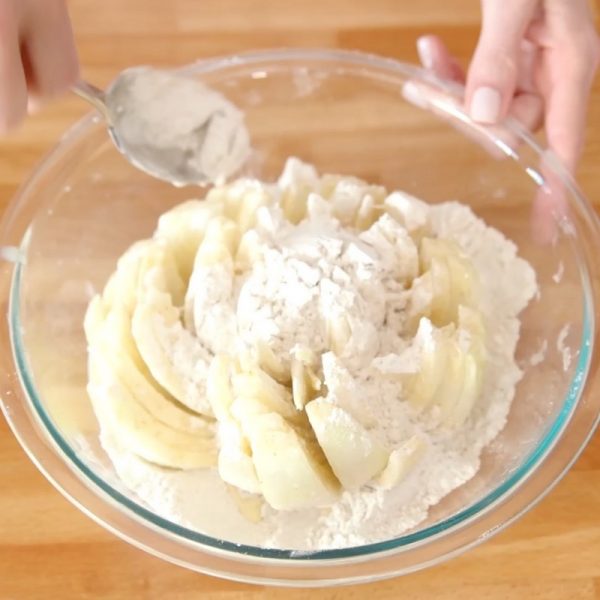
First, place your onion flower cut-side up into the bowl with the flour mixture. Spoon the drying coating between the cuts. Once the onion is fully coated, lift the onion and turn over to shake off the excess. Reserve the flour mixture.
Then dip the onion cut-side up into the bowl with egg wash, and submerge the onion completely. You can spoon the mixture onto the onion to make sure it’s thoroughly coated with the batter. For the best result, let the onion soak in the batter for 10 minutes.
Lift the onion and let the excess egg wash drip off and place it cut-side up into the flour mixture bowl one more time. Coat it with dry coating again. This process makes sure all that great stuff clinging to the onion turns into deliciously crispy bits by the time it’s finished cooking.
After finishing the dipping process, you can lift the onion and place it on a plate. Freeze for 30 minutes to 1 hour. It’ll solidify and hold together better while cooking.
Deep Frying
Heat oil in a medium-sized deep pot or deep fryer to 350°F (make sure there is enough oil to cover your onion completely). Take precautions since this is hot oil — use a large slotted spoon or tongs to move the onion slowly into the oil, cut-side down. Make sure the temperature stays close to 350°F.
Fry for about 3 – 4 minutes, and turn the onion over. Fry another 3 – 4 minutes until the onion has turned golden brown. It’s about 7-8 minutes total to get your onion fully cooked. Remove it from the oil and place it on paper towels to drain off the excess oil.
How to Make Blooming Onion Sauce
If you like the signature dipping sauce from Outback, here is a really easy way to replicate it: Mix together Thousand Island dressing and creamy horseradish sauce. Adjust the amount of horseradish depending on how spicy you’d like your sauce to be. You can also mix in some ketchup as you like.
Tips for Making the Perfect Blooming Onion
- Use a large, sweet onion variety such as Vidalias, which have a mild flavor and are easy to cut.
- Cut the onion correctly, taking care not to cut through the bottom.
- Soak the onion in cold water for at least an hour before battering to help it bloom.
- Freezing the onion after battering is helpful to hold the onion together during frying.
- Deep fry at 350°F (175°C) and keep the oil temperature constant for the best results.
- Serve immediately, as blooming onions are best when freshly prepared.
How to Store Blooming Onion
Storing a blooming onion can be a bit tricky because it can quickly lose its crispy texture and become soggy if not stored properly. To start, let it cool completely. Then wrap tightly with plastic wrap, squeezing out air. Place in an airtight container and store in the fridge for up to 3 days.
How to Reheat Leftover Blooming Onion
The best way to reheat a blooming onion is on a baking sheet in the oven at 375°F. It should get somewhat crispy again after about 10 minutes. Avoid microwaving, which will make it soggy.
How Long Does Homemade Blooming Onion Last?
Homemade blooming onion can last for up to 3-4 days if stored properly in the refrigerator. Do not freeze.
How to Serve Blooming Onion
To serve a blooming onion, place it on a large plate and use your fingertips to gently pry it open from the center. Then place a small bowl of dipping sauce in the center. Serve warm.
Watch Recipe Video:
This tutorial shows how to make a bloomin’ onion:
FAQ
Can I Make Blooming Onions in the Oven?
Yes, you can make blooming onions in the oven although they won’t be as crispy as deep-fried. Place the blooming onion on a baking sheet in a preheated 400°F oven for 30 to 40 minutes. Turn on the convection or forced air function in your oven if available.
What is the Blooming Onion Batter Made Of?
The blooming onion batter is made with eggs, milk, flour and spices.
Do You Need to Soak A Blooming Onion in Water?
Yes, soaking the onion in water helps to remove excess starch from the onion, so it blooms more evenly and becomes crispier when fried.
What’s the Best Oil to Use for Making Blooming Onion
You can use vegetable oil, canola oil, sunflower oil or peanut oil for deep frying a blooming onion, so pick your favorite.
How to Make Air Fryer Blooming Onion
If you want to avoid deep frying, making an Air Fryer Blooming Onion is a great alternative that’s also healthier. The approach is similar and the onion goes into the basket of an air fryer preheated to 375°F. It will take about 15 to 20 minutes to cook.
Blooming Onion Recipe
Ingredients
- 1 large sweet onion, Vidalia or similar
- 2 1/2 cups all-purpose flour
- 2 tablespoons paprika
- 1 teaspoon cayenne pepper
- 1 teaspoon garlic powder
- 1/2 teaspoon oregano
- salt and pepper, to taste
- 2 large eggs
- 1 1/2 cups milk
- 1 quart vegetable oil, or canola, sunflower, peanut or similar
- Chipotle, Thousand Island or other dipping sauce, optional
Instructions
- In a medium bowl, combine flour, spices, salt and pepper. Reserve.
- In another medium bowl, whisk together eggs and milk until combined. Set aside.
- Cut off ½-inch from the pointy end of the onion while leaving the other end of root intact. Then remove the papery skin.
- Place the onion cut-side down on a cutting board. Starting ¾-inch from the root, cut vertically downward all the way to the board using a sharp knife.
- Repeat vertical cuts downward about 1/2-inch apart on the edge, taking care not to overlap with previous cuts. You should get 10-15 cuts in total.
- Turn the onion over and gently open up the “petals” of the onion with your fingers until it resembles a flower. Set aside.
- Dip the onion into reserved flour mixture to cover completely. Then gently shake off excess flour.
- Gently dip into reserved egg mixture to cover completely. For best results, let the onion soak in the batter for 10 minutes.
- Return onion to the flour mixture one more time and cover completely.
- Place the onion on a plate and freeze for 30-60 min to set.
- Fill a deep fryer or medium saucepan with 3 inches of oil and heat to 350°F. Line a plate with paper towel and set aside.
- Fry onion for 3-4 minutes until golden brown. Then turn it over using a slotted spoon and cook several minutes more until golden brown.
- Remove onion to a prepared plate. Serve with optional dipping sauce and enjoy!
Equipment
Notes
- You’ll find it helpful to watch the video for this recipe before making it.
- For the dipping sauce, you can mix Thousand Island dressing with creamy horseradish sauce, adjusting the amount of horseradish depending on how much heat you want.
Please read our nutrition disclaimer.
© TIPBUZZ. Images and text on this website are copyright protected. Please do not post or republish without permission. If you want to republish this recipe, please link back to this post. This post may contain affiliate links. Read the disclosure policy here.


I made this recipe with no alterations. It came out WONDERFUL!!! My husband decided he loves me to make him blooming onions from now on, preferably one a day!lll..lol..I find that, even though I refrigerate it for an hour, when I fry it it closes some, starting with cut up down. I’ll try FREEZING the prepared onion as suggested in this video, and I hope I will get the perfect one yet!
Hi Vivian, Congrats! They’re not the easiest recipe, but definitiely one of the most satisfying as your husband has confirmed! Freezing might work better or put it at the bottom of your fridge. Thanks for your comment and here’s wishing you many happy blooming onions to come!
Looks so good
Hi! Is it ok if I freeze the onions overnight?
Hi Lea, Thanks for your comment. Yes, you can absolutely freeze the onion overnight until hard before frying.
What can be used instead of egg. We don’t eat eggs
Hi Putity, Thanks for your question. Unfortunately I don’t have a good substitute for you here, since eggs are the key binding agent to make the breading stick. Sorry!
I wanted to bake the bloom. Is that possible?
Hi Linda, Thanks for your question. The answer is yes, but it won’t be as crispy. The recipe is quite different and I don’t quite recommend it.
Made it turned out perfect. I soaked the o up. For 30 in water it helped open it up
Great.
Hi Pete, Thanks and awesome to hear. Soaking the onion in water is a great suggestion! 🙂
Something went wrong. It was soggy and soft. What did i do wrong?
Hi Sylvie, Sorry to hear. Likely your oil was not hot enough – did you use a thermometer?
Its amazing Josefina
Made it today …was wonderful.. thanks so much for the information on how to do it.
Hi Delois, Thanks for your comment and so glad to hear that! See you soon on the site. 🙂
My husband and I followed this recipe (dusted, soaked 10 minutes, dusted, placed in freezer 30-60 minutes, deep fried 4 minutes stem down, 4 minutes top down) and wondered why we EVER paid for what we could do at home! A-FRIGGIN’-MAZING!!! Thank you so much for this! YOU ROCK!!
Hi there, Thanks for sharing and that’s amazing to hear! Sounds like you’ve got it mastered! 🙂
I made this according to the receipe- even putting it in the freezer for 60 minutes as suggested. Fried until golden – more than 3-4 minutes on each side. So disappointed. Onion was good but the whole thing was soggy breading – not crisp. I would have to fry it way longer
Yes, the oil was 350
Would not make again
Hi Kathy, Thanks for your feedback and sorry it didn’t work out. The only question is whether the oil temperature dropped after the onion went in, making it soggy… 🙁
Can I grill the onion instead? I don’t deep fry. I’m thinking I’ll spray it with cooking oil before grilling.
Hi Laura, Yes you can certainly bake or grill on a baking sheet at 375°F for 20-25 minutes. It’s won’t look as golden, but will still be delicious. If the edges start to char, cover with aluminum foil. Enjoy 🙂
I hate to sound like a jerk, but there was too much flour, which made it really blan :/
Hi Justin, No problem, did you shake off the excess flour before frying?
Can I cook this in an Air Fryer
Hi there, I haven’t tried it yet for this, but will report back when I do 🙂
Have u tried the air fryer yet?
Hi Barbara, Sorry, I haven’t but will update as soon as I do. 🙂
In the description, you say you put the onion in the egg wash then spoon the flour on it. However, the recipe says to put it in the flour first, then into the egg wash. Which is it?
Hi Stelaton, Thanks for your question. You should be dipping into the flour mixture before AND after the egg wash. I’ve updated the description accordingly. 🙂