How to Marble Chocolate
This post may contain affiliate links. Please read the disclosure policy.
Learn how to marble chocolate for a fancy look and beautiful color contrast. All you need is some chocolate, a second color of chocolate or decorating gel and a toothpick. It’s fun and easy to do!
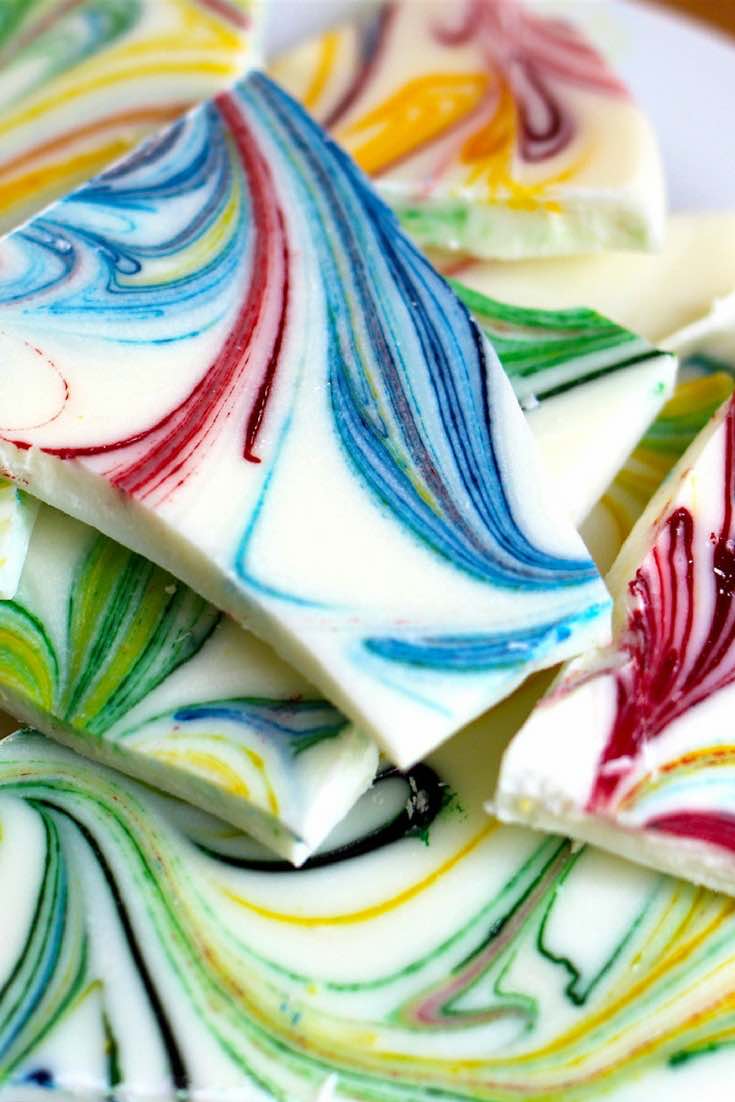
Marbled chocolate is useful for topping cakes and desserts or just to eat as chocolate bark. While restaurants often use this technique to create an eye-catching presentation, it’s really much easier than you think to achieve at home!
You can use dark chocolate or white chocolate for the base, and then swirl in a second color of chocolate. Another option for white chocolate is using decorating gel like we have here for a colorful rainbow look. It’s so much fun and you only need 15 minutes of prep to do it.
Marble Chocolate
To get started, set aside a medium baking sheet lined with a nonstick baking mat or some parchment paper. Then smoothly melt the chocolate over a double boiler or in intervals in the microwave. If using a second chocolate, melt it separately the same way.
Pour the melted chocolate into the middle of the baking sheet and spread out your desired thickness using a spatula. Next, add the second chocolate in several S-shapes the length of your finger. A piping bag or squeeze bottle is ideal for this.
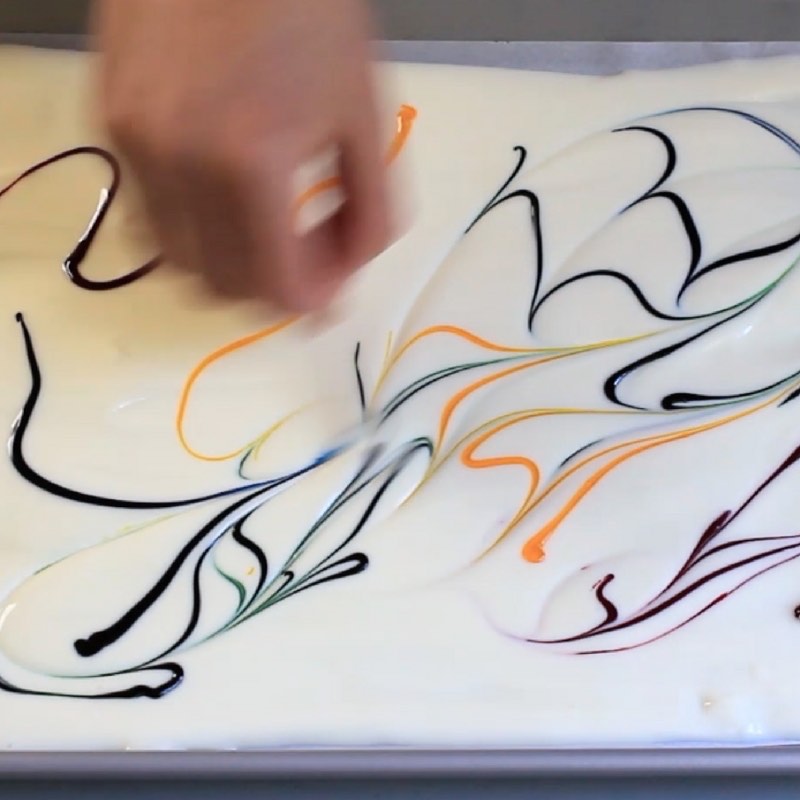
Now take a toothpick, cake tester, skewer or needle. Use it to slowly make larger wavy motions through the two chocolates. You’ll see the marble patterns start to emerge, and you can decide how refined to make them. Hint: It’s easy to overdue it, so don’t hesitate to step back and take a look from time to time.
Once you’ve got the look you want, place the baking sheet in the freezer or fridge for at least two hours to harden completely.
Watch Video Tutorial
This short video tutorial shows how to marble chocolate:
More chocolate techniques:
View all cooking basics
How to Marble Chocolate
Ingredients
- 20 oz white chocolate, or dark chocolate (see note)
- 3 colors decorating gel, or 4 oz dark chocolate
Instructions
- Line a medium baking sheet with parchment paper or a nonstick baking mat.
- In a medium bowl, add chocolate for the base (see note). Melt it using the double boiler methods over a pot of barely simmering water, or in the microwave using 20-second intervals at medium power. Stir periodically until smooth.
- If using a second chocolate for marbling, melt in a second bowl using the same method.
- Pour the melted chocolate into the middle of the prepared baking sheet. Spread it out to your desired thickness using a spatula (1/8-1/4 inch is ideal).
- Drizzle 7-8 straight lines of the second chocolate or decorating gel onto the melted chocolate. Then slowly wave a toothpick/skewer/cake tester/needle in large S-shaped strokes to create colorful swirls through the chocolate. Continue until you achieve the look you want.
- Place the baking sheet in the fridge or freezer for 2 hours or more to harden completely. Break into pieces to serve or use as directed on cakes or desserts.
Notes
- Chocolate: It's best to use quality baking chocolate from brands such as Baker's, Ghirardelli, Lindt and Callebaut, to name a few. Chocolate chips are more prone to seizing up and clumping.
- Colors: Look for the most striking color contrast in selecting your ingredients. For example, if you're using white chocolate as the base, use dark/milk chocolate or decorating gels for the swirls. If you're using milk or dark chocolate for the base, white chocolate is ideal for creating the marbling.
- Storage: You can store marbled chocolate in airtight containers or resealable plastic bags in the fridge for up to one week, or in the freezer for up to 3 months.
Please read our nutrition disclaimer.
Recipe tools:
© TIPBUZZ. Images and text on this website are copyright protected. Please do not post or republish without permission. If you want to republish this recipe, please link back to this post. This post may contain affiliate links. Read the disclosure policy here.